Introduction

The Loading Module: Your Partner in Efficient Goods Transport
Navigate through the complex world of goods shipping with our Loading Module. Specially designed for monitoring the shipments of purchased goods, this module makes managing international transports a streamlined process, especially when they come from the Middle or Far East via sea freight or air freight.
Features and benefits include:
- Registration of Shipping Documents: Start by registering the essential details of the shipment as stated on the Bill of Lading or Air Way Bill.
- Container Registration: Then track the containers in which your goods are packed, and link them to the respective purchase order lines of one or more purchase orders.
- Real-time Tracking: Monitor the expected departure and arrival times (ETD and ETA) to ensure accurate timing of delivery.
- Centralized Receipt: Once the goods have arrived at the destination, the module facilitates a central receipt of all orders in one action, saving time compared to receiving each purchase order individually.
- Integration with BizBloqs: For a seamless receipt procedure per warehouse scanner.
- 3-Way-Matching Integration: This module is also integrated with the 3-way-matching plugin from Uniconta Netherlands, which significantly simplifies the reconciliation of invoices with the received goods.
The Loading Module is a crucial tool for companies aiming for smooth, organized, and cost-effective goods transport. Discover how the Loading Module can transform your shipping and receipt processes, contributing to higher operational efficiency.
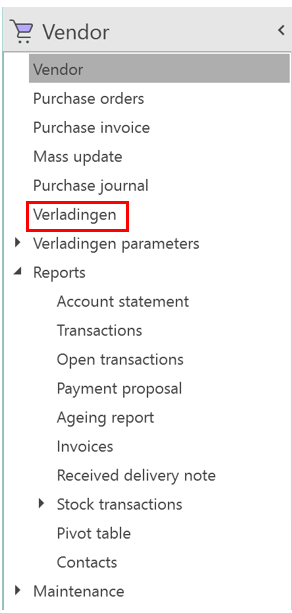
Where to find?
In Uniconta go to the ‘Vendor’ tab, here you can find the ‘Shipment’ module.
What to do with this module?
This module makes it possible to attach shipments to purchase orders. This could be useful because it can give the user the opportunity to track the estimated time of arrival of a purchase order and ‘reserve’ a portion of a shipment for a purchase order.
Add records
The first screen the user sees using the ‘Shipment’ module will show the shipments that have already arrived or are on their way. To start, the button ‘Add Record’ will create a new shipment, the record exists out of multiple columns.

The most important ones are:
| Bill of lading id | The unique number of the shipment, please use the unique id number of the shipment bill received from the vendor. |
| Vendor | The vendor where the goods are bought, must be the same as the one that is used in the purchase order. |
| Receipt warehouse | The warehouse of the user where the goods will be sent to. |
These 3 columns must be filled to continue to the next step.
Next to 3 most important columns, there are (these will only be used as information):
| Transport company | This allows the user to add the used transport company. |
| Voyage number | The number that is connected to the voyage of the shipment, related to the transport company. |
| Port of loading | The port where the container will be loaded. |
| Port of discharge | The port where the container will be discharged. |
| Estimated Time of Departure (ETD) | The date that the container is expected to depart the port of loading. |
| Estimated time of Arrival (ETA) | The date that the container is expected to arrive at the port of discharge. |
| Container mode | Full Container Load (FCL) or Less Container Load (LCL) |
| Consignor name | The name of the consignor of the shipment. |
| Total packages | The amount of packages in the shipment. |
| Items received | The date the shipment is received in the warehouse. |
| Pre-advice created | The date that the carrier is notified that the shipment is taking place. |
| Actual Time of Departure (ATD) | The actual date that the container departed. |
| Actual Time of Arrival (ATA) | The actual date that the container arrived. |
| Production date ready | The date when the goods are available for production. |
| Cargo delivered expected | The expected date when the goods will be delivered to the warehouse. |
| Cargo delivered actual | The actual date when the goods will be delivered to the warehouse. |
| Cargo ready expected | The expected date when the goods will be ready for production. |
| Cargo ready actual | The actual date when the goods will be ready for production. |
| First ETD | The first expected date of departure. |
| Group | The way the record was created. |
Containers
After filling in all the details of the shipment, the user can click on ‘Containers’. This will lead the user to the second screen.

On the second screen, the user can indicate the container IDs that are included in the bill of lading. To do this the user can click on ‘Add Record’.

The columns that are used in this screen are:
| Container id | The id of the container that is part of the shipment, can be found on the bill of lading. |
| Container type | The type of container that is used (e.g. 20ft container, 40ft container, etc.) When a container type is chosen it also automatically fills the Port Handling days and calculates the ETA in the warehouse. |
| ETA Harbour | Estimated Time of Arrival in the harbour of discharge. |
| Port Handling days | The number of days that the port will need to handle the containers. |
| ETA warehouse | Estimated Time of Arrival in the warehouse of the user, if not changed manually this will be the ETA Harbour date with the Port Handling days added. |
| Warehouse handling days | The number of days that the warehouse will need to handle the container, after this the goods will be ready for production. |
| Customer shipping date | The date when the goods need to be shipped to the customer, if not changed manually this will be the ETA warehouse with the Warehouse handling days added. |
| ATA warehouse | The Actual Time of Arrival in the warehouse of the user. |
| Number of boxes | The number of boxes included in the container. |
Container Lines
When the container id is filled, the user can go to the container lines by clicking on the ‘ContainerLines’ button.

When the user opens the Container Lines the following screen will appear.

Marking
The first thing the user will notice is that it is not possible to add records here, that is because it should be matched with a purchase order. To do so the button Marking comes into play. If for a purchase order the same vendor and warehouse are chosen as for the shipment the items will be visible in a pop-up screen when you click on ‘Marking’.
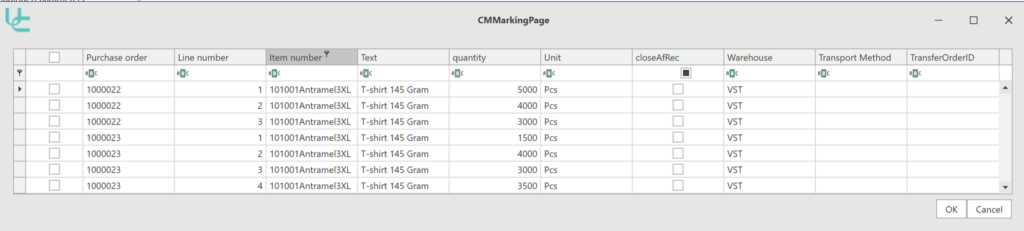
From the pop-up screen the following columns are important:
| Purchase order | This column tells the user from which purchase order the order line is. |
| Quantity | This column tells the amount of each product that is on the purchase order. |
| Warehouse | This column tells the user what the designated warehouse is of the purchase order line. |
In the first column, the user can check the box of the order line if it is included in the shipment. If, for example, this shipment contains all items from order number 1000022 the user must check the first 3 boxes and click ‘OK’.

Split
If the amount on the bill of lading is different than on the purchase order it is possible to split the shipment into two shipments. The user must go to the column called ‘Quantity now’ and change it to the quantity given on the bill of lading. If the quantity is changed the user can click on the ‘Split’ button.

The ‘Split’ button will also cause the purchase order to split one order line in two order lines. If for example the first line in the screenshot is split, it will do the following in the shipment and in the purchase order.
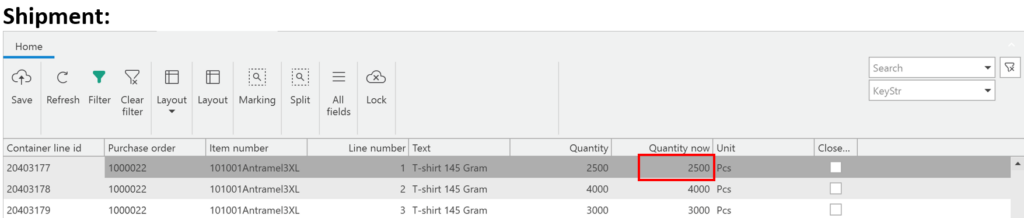
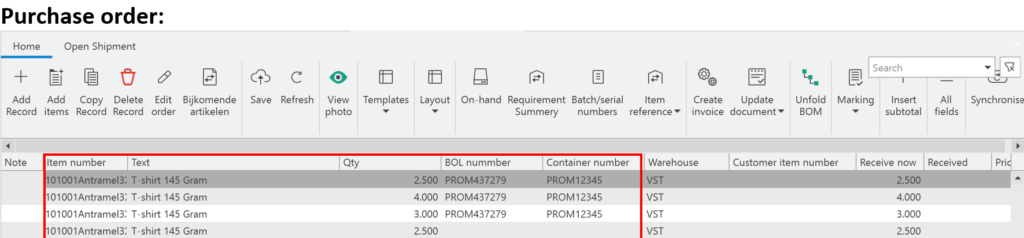
The initial amount of the first order line was 5000 pieces, due to the split it is divided into two different order lines. The order line that is in the shipment has a BOL (Bill of Lading) number and a Container number, the fourth order line in the screenshot above can be put into another shipment.
Adjusting the ETA
For the shipment, the ETA can be changed if needed. A change in the ETA will cause the module to automatically change the ETA Harbour in the Container screen. This will change the ETA warehouse date and ultimately the customer shipping date will change.
Update delivery note
In the ‘Shipment’ screen there is a button called ‘Update delivery note’. When the shipment is received by the warehouse of the user this button needs to be clicked, it will automatically go by all purchase orders and mark the order lines in the shipment as received.

To confirm the following pop-up will appear.
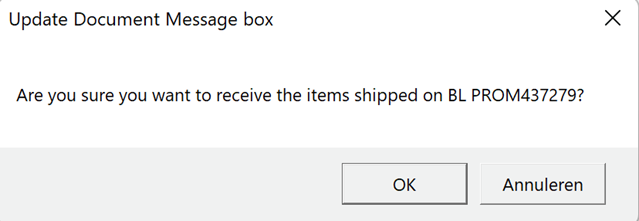
When the user clicks on ‘OK’ the module will tell Uniconta that the items are received and ready for shipment to the customer.
Process order
- Purchase order created
- Purchase order sent
- Purchase order confirmed
- Production started
- Production finished
- ETD estimated departure
- ATD actual departure
- ETA estimated arrival
- ATA actual arrival port
- Actual arrival warehouse
- Actual warehouse entry
- First possible day to deliver to customer
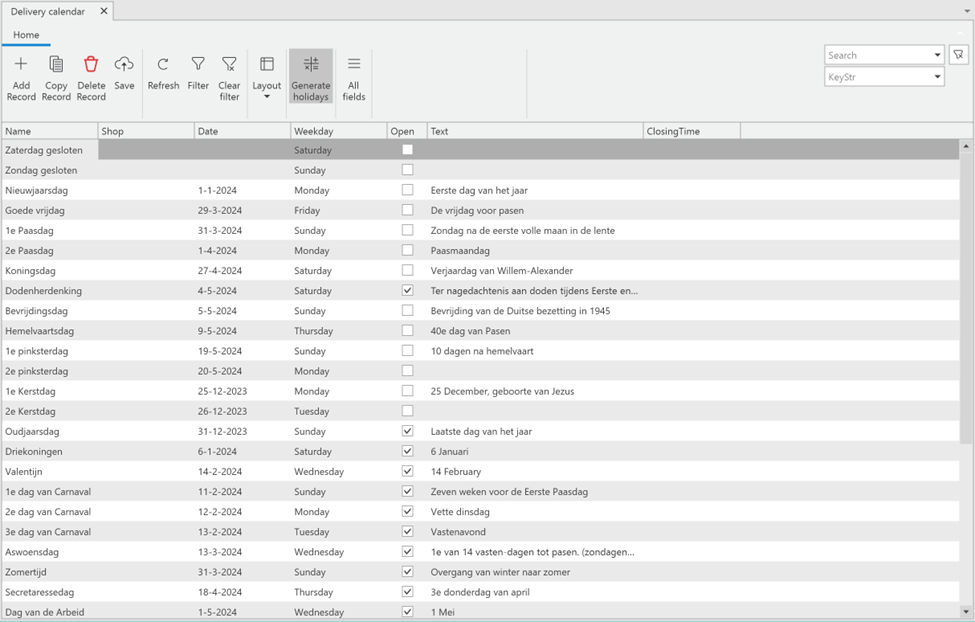
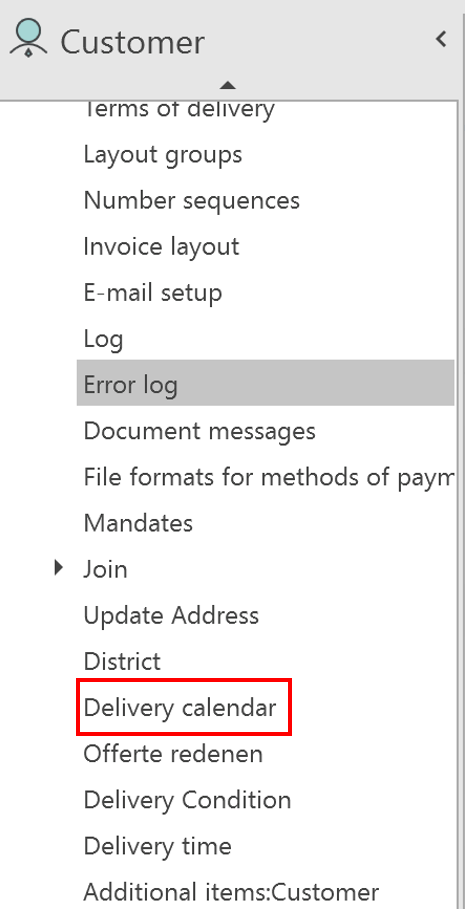
Delivery calendar
The delivery calendar can be found under ‘Customer’ – ‘Maintenance’ – ‘Delivery calendar’
With the delivery calendar, the user can indicate if the company is closed during holidays, weekends, and other specific dates. The easiest way to create the delivery calendar is by pressing the ‘Generate holidays’ button, this automatically adds all the known holidays.
After this, the user can use the checkbox to indicate whether the company is open or not. It is also possible to add a closing time for holidays, this can be done in the column ClosingTime and should be formatted like e.g. 17:00.
To manually add a day to the calendar press the ‘Add Record’ button, fill in a date, give it a name and, when necessary, a closing time. In the Text column, the user can give a short explanation of the holiday.
Uniconta will use the delivery calendar to determine ETAs of purchase orders, ETDs of customer orders, etc. If for example the company is closed in the weekends, it will automatically skip the weekends when determining the ETD of the customer.